|
|
Post by brantleycmd on Apr 15, 2017 6:48:19 GMT
So this weekend I saw a big old piece of cardboard laying around and decided to take a crack at laying out a glares shield. Did a bunch of measuring and what not and rugured out all the cutouts and spacing. Made a template. Today I went out and got 1/4" MFD board and a bit of hardware (brackets and what not) and will start making the real deal tomorrow Side note, I stumbled across a really great tool, the Black and Decker Matrix. Its basically a multi tool, where you have different attachments that hook up to the base. It came with the drill attachment of course, but then I got a circular saw and jig saw attachment. Overall for 3 tools, I spent about $70. Which is pretty good in my opinion. ANYWAY, back to it. So here are the pics I have so far of just the cardboard template. its a 1:1 scale so I could get an idea of what I was working with. Will be starting on the MFD board tomorrow. 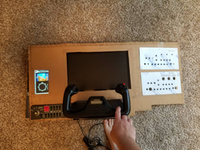  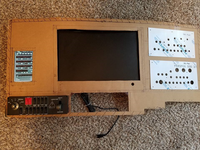 |
|
|
|
Post by brantleycmd on Apr 15, 2017 6:48:36 GMT
|
|
|
|
Post by brantleycmd on Apr 15, 2017 6:55:43 GMT
I had this idea to use my Android tablet, running the FSRadioPanel app, mounted behind the glare shield. Maybe even make the part its mounted on a hinged door so I can easily remove it if I need to. I left space to the right of the tablet for what I think may be a good solution to my radio panel dilemma. (Although I should just get the Saitek Radio Panel and call it a day) BUT I figure maybe I can make a small button panel with a few rotary encoders and buttons to serve as my radio/nav/adf/xpdr controls. So I would set them up right next to the tablet on the glare shield and since the FSRadioPanel app syncs with FSX, I can control the radios physically, and see the stack!! Since this is a tablet I don't use regularly (been in a drawer for a year) I have no problems with dedicating it to my sim. Should work great!
|
|
|
|
Post by MarkH on Apr 15, 2017 7:23:36 GMT
For a moment I thought you were actually going to make this out of cardboard! For the radios, don't forget that you can use the rotaries on the GPS+ panel for those, even if you don't have a GNS-530 installed. It will just take a bit of extra thinking out about how to set up the LINDA mappings. I would think you could use the Android app for display and the knobs for input, although they will be at different ends of the panel. P.S. You need a bigger screen. And hence probably a bigger closet  |
|
|
|
Post by brantleycmd on Apr 15, 2017 7:43:37 GMT
haha yeah, I do need a bigger screen, out of this shot though is another 27" monitor on a desk mount, I usually have them side by side displaying visuals. I am toying with the idea of a short throw projector mounted above my head, the wall in there would be perfect for it. The tricky bit is going to be figuring out how to mount my 19" monitor that i display my instruments on to the back of the MFD. I took the plastic housing off, and it is actually a pretty sturdy and slim screen, so I may just made a little slide in rail or something.
I had thought about using the GPS radio controls, however I figure if i do it the way I am thinking of, I can use those knobs on the GPS+ for something else.
|
|
|
|
Post by brantleycmd on Apr 17, 2017 7:03:02 GMT
Spent the night up at the shop making the cuts to my MFD board. Tomorrow will be painting/Hardware install. One thing i have to figure out is how I am going to mount this monitor behind the glare shield. I took it out of its plastic housing so that has made it a little easier to figure out a good way to mount it. I also rounded the corners to make it more like a GA glare shield. Anyway, progress made!! ![]()   |
|
|
|
Post by brantleycmd on Apr 17, 2017 7:03:53 GMT
SHould also mention i have a little sanding to do haha
|
|
|
|
Post by MarkH on Apr 17, 2017 7:44:20 GMT
SHould also mention i have a little sanding to do haha Looking good so far. What colour are you going to paint it? |
|
|
|
Post by brantleycmd on Apr 17, 2017 19:54:50 GMT
SHould also mention i have a little sanding to do haha Looking good so far. What colour are you going to paint it? I'm just going to go with flat black to match my desk and panels. |
|
|
|
Post by brantleycmd on Apr 18, 2017 8:11:40 GMT
Update: All painted, and the monitor is mounted. I spent quite some time trying to come up with exactly how I was going to mount the monitor. In the end i decided to remove it from its plastic housing. I notices two threaded holes on each side. Found some aluminum trim in the crap pile at work, and used it to make an L mount flush with the front of the monitor. Drilled a couple holes, bing bang boom MOUNTED! Used some finishing washers to give it a nice look up front. You may also notice that I didn't have the proper length screws for the monitor mount, so I ended up using something like 8 washers to make a spacer. After a mix up with the place I bought my rotary encoders, I'll be finishing my GPS + panel tomorrow. I ordered 1/4" long shafts, and they sent 1", and I ordered round hole knobs, and they send D shaped. Fortunately they made up for it by sending the correct ones, and letting me keep the mistake.    |
|
|
|
Post by brantleycmd on Apr 18, 2017 8:12:52 GMT
|
|
|
|
Post by MarkH on Apr 18, 2017 17:28:21 GMT
Oh wow, that's looking pretty darned good!
|
|
|
|
Post by brantleycmd on Apr 19, 2017 9:11:56 GMT
Today I put together my GPS+ Panel. Had to substitute a couple buttons. The round buttons listed on the components list have a month long back order. I'm impatient. Also, couldn't get ahold of the Green Square buttons. The site you have charged me twice what the cost of the parts are to ship to the US. So I found buttons on ebay, no green though. Waiting on knobs. Also, no latching small button on mine, again, too much for shipping for one button. I did find the rotary encoders for half what leo charges, with free shipping in the US from Arrow Electronics. Though that may not be as cost effective for you in the UK. Next I made a mount for my tablet out of the same scrap trim as the monitor. Bent it into a Z shape to flush mount it. going to glue some felt to the back of the board to make sure the screen doesnt get scratched going in and out.  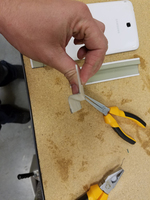 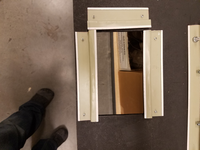 |
|
|
|
Post by brantleycmd on Apr 19, 2017 9:15:50 GMT
Mounted everything, cut the mount to accommodate the tablet buttons. I'm really happy with how it is turning out. Tomorrow I will figure out how I am mounting it to my desk, and I'll be mounting a powered USB hum to the back of the panel as well. Can't wait to free up some USB slots on my PC. 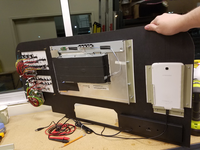   |
|
|
|
Post by MarkH on Apr 19, 2017 17:29:19 GMT
AND NOW FOR THE IN-FLIGHT DEMO VIDEO... |
|


